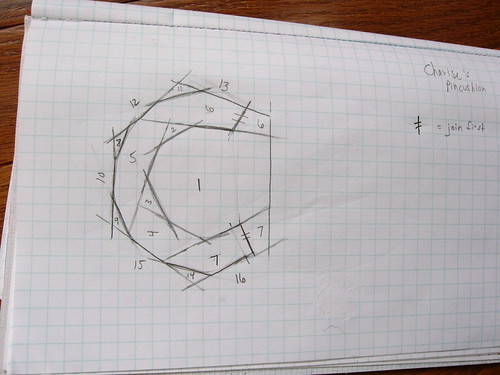
I used a mix of paper and improvisational piecing. Straight paper piecing will give accurate results and a clean finished project, but I'm often too lazy to go to the copy store to reverse my drawing and also too lazy to wrestle with the paper for the tiny piecing. So, first I start with a detailed drawing.
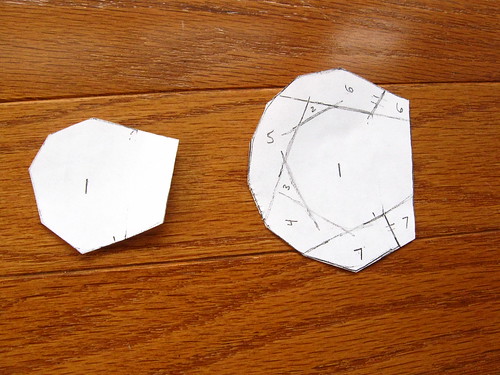
Then I make at least two regular copies of my drawing (my copier at home can do this much) and I cut out piece 1 like a template and I cut out pieces 1-7 all joined as a second template.
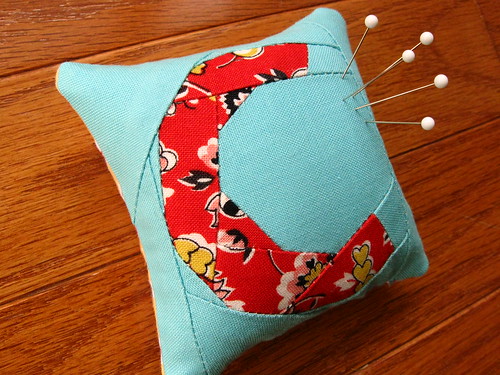
You'll see that pieces 6 and 7 have extra hash marks because the red fabric has to be joined to the aqua background fabric before joining it to piece 1. So, next I prepare pieces 6 and 7 by sewing two small strips of the two colors together. Then I use my template of piece 1 to cut the aqua background fabric adding a 1/4" seam allowance all around. Next I sew pieces 1-7 together and use the 1-7 template to trim off the excess fabric (remembering to add a 1/4" seam allowance). Then I continue piecing 8-16 on. Then I trim that to a square and make it into a pincushion.
I don't know if that clarifies anything, but I thought I'd try to explain my process a little. Someday I'll have to remember to take more pictures when I'm in the midst of this piecing. (I think I turn into a sewing/cutting/ironing whirling dervish when I'm in the middle of making these blocks, so the photos may be awhile.)
I placed some plain white fabric behind the front and back squares of the pincushion before sewing them together. I stuffed this pincushion with crushed walnut shells--otherwise known as "lizard litter" at the pet store. Then I whip stitched the opening closed.
Okay! This will be on its way to Charise soon!
I have a "V" and an "S" pincushions left to do for the giveaway, so stay tuned.
For those of you that want to try paper or improv piecing and designing your own blocks, I highly recommend practicing with letters of the alphabet. Especially L, T, H, V, M, A or a squared-off O. Then you can try curved letters C, U, D or a curved O. I'd save a curved S, B, G, Q, R and lowercase e and g for last. I did other posts here and here about my designs for a couple of other letters. Good luck to you!


Fun to see a bit of your process! I completely understand about not being able to photograph during the most intricate part, your head and hands are full enough at that point!
ReplyDeleteJust gorgeous! I love seeing all of the different ideas and techniques used for pp!
ReplyDeleteWow, this came out great! It's helpful to see your sketch
ReplyDeleteMelinda - oh my gosh I had no idea I won!!! I'm so excited - it is lovely. Thank you so much!!!!
ReplyDeleteIt's fantastic!!
ReplyDeleteWow!! Wonderful!! My fingers are crossed!
ReplyDeleteHugs from Brazil!!
That looks awesome! Maybe someday I'll have to try some letters :)
ReplyDeletegood god woman!
ReplyDeleteyou are amazing!!
i love it! those pieces are so tiny... you are just so flippin'awesome!!
ps - love the new layout/banner
it's so fun! i like your hand made initials much more than the copies. :) you do such a great job! love your fabric selection as well.
ReplyDeletewow, i'm super impressed! this looks so super complicated but it turned out just wonderful! you have such a wonderful knack for color/pattern combinations!
ReplyDeleteJust happened upon your blog while surfing the net. Cool pincushion and Christmas tree ornament! Your ski jacket block is perfect and I really liked the jam-making block. Your "swimmy" quilt is fantastic. Very enjoyable blog!
ReplyDeletebest from Tunisia,
nadia
I love this! Perfect for my sewing room. My name starts with a C.
ReplyDelete