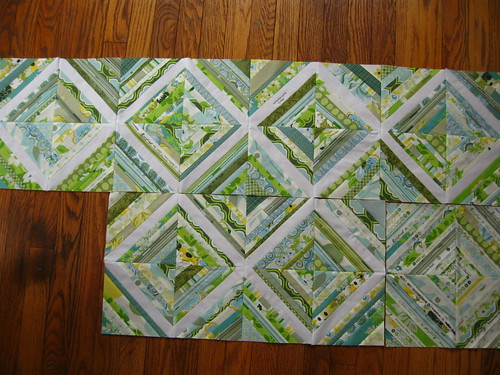
The bee blocks keep drifting in to my mailbox this month. I've been finishing them and sewing them together into my quilt top. I'm up to 15 blocks, and 8 of them are from the bee. What do you think so far?
My turn again!
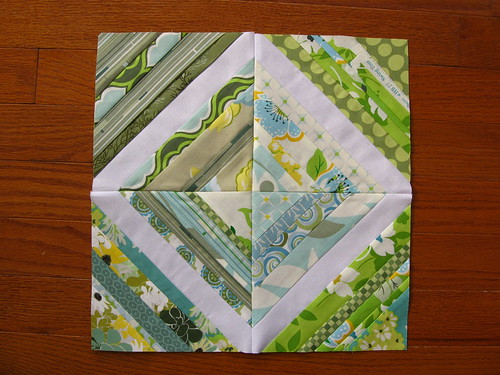
I cut about a billion strings to mail off to the Green Bee participants. And then I cut another billion more for me. I made the three blocks below. For each block I tried harder and harder to group colors to make them look less balanced as a block so that the whole quilt would have some variations and interest.
Last week, I received my first block from bee member, Sharon, or neshamamama. (The tape with the name is only temporary until the quilt top is finished.)
Then I used some sniglet scraps to make some strings and I made this block.
And here is how the first seven look together.
I swear that I tried to make an ugly block just to see if it would work in the final quilt. With these fabrics, it just doesn't seem possible. I'm so, so, so pleased with how it is turning out. The final quilt will have at least 30 blocks, so I'll try not to bore you again with a block-by-block update. I can't make any promises, though.
Labels:
bee blocks,
quilting,
sewing
New Year Catch Up
Do you ever feel like the calendar keeps moving faster than you do? I'm the kind of person that likes a certain amount of time to be quiet and reflect--especially at the end of one year and beginning of the next. Instead, the calendar is over two weeks ahead of where I am mentally. Quiet reflection time is hard to come by these days. Henry has around 250 words now and is very interested in asserting his opinion (usually "no") and he's also busy running and trying to jump). When I feel surrounded by daily to-do list items, it is hard to take a deep breath and look at the big picture. Every night I'm going to bed after midnight even when I feel like it should only be 10:00pm.
Hmmm.... Rereading that last sentence makes me wonder if I need to catch up on some sleep first. And take some deep breaths.
In the meantime, know that I'm grateful for this space to express myself and for the opportunity to hear from you. I treasure the comments and feedback here. I'll leave you with my favorite image of the holiday season. This is Henry "helping" with the cookie baking.
Hmmm.... Rereading that last sentence makes me wonder if I need to catch up on some sleep first. And take some deep breaths.
In the meantime, know that I'm grateful for this space to express myself and for the opportunity to hear from you. I treasure the comments and feedback here. I'll leave you with my favorite image of the holiday season. This is Henry "helping" with the cookie baking.
Barely coming up for air...
I'm *still* in the throes of holiday crafting. Yes, the holiday was yesterday, but I don't see my family until next weekend---so their gifts aren't done yet. I can tell you that if I manage to finish them all, it would be a post-holiday miracle.
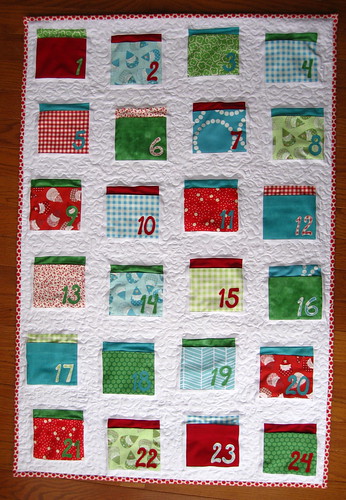
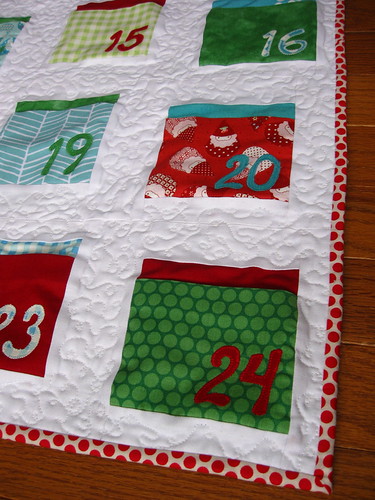
Anyway, I have tons of photos to share and projects to write about, but I'm just popping in to show off one thing, my advent calendar:
This is from a tutorial by Elizabeth of Oh, Fransson! on the Sew, Mama, Sew! blog.
I used a variety of fabrics and highlighted more prints than the tutorial suggested.
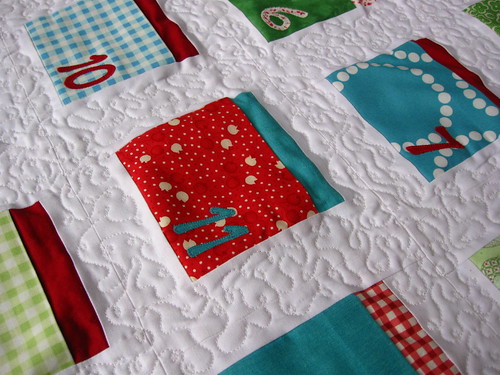
I also changed the seam allowance for the pockets so more of the background fabric would be seen. I chose a loopy quilting pattern rather than the meandering stitch. This is the first time that I've ever used a free-motion quilting presser foot.
There is a lot of room for improvement in my quilting technique, but I'm still pleased with how it turned out.
I used Kei honeycomb dots for the binding. Don't you just love a good dot fabric?
This was the first time that I ever hand stitched the binding to the back of the quilt. It really does look invisible.
I hope your holidays were delightful. We've been busy reading books, playing with trains, dancing to Bing and doing "dishes!" Henry would rather roll up his sleeves and drag a chair up to the sink than play with his toys. Silly guy :)
Anyway, I have tons of photos to share and projects to write about, but I'm just popping in to show off one thing, my advent calendar:
This is from a tutorial by Elizabeth of Oh, Fransson! on the Sew, Mama, Sew! blog.
I used a variety of fabrics and highlighted more prints than the tutorial suggested.
I also changed the seam allowance for the pockets so more of the background fabric would be seen. I chose a loopy quilting pattern rather than the meandering stitch. This is the first time that I've ever used a free-motion quilting presser foot.
There is a lot of room for improvement in my quilting technique, but I'm still pleased with how it turned out.
I used Kei honeycomb dots for the binding. Don't you just love a good dot fabric?
This was the first time that I ever hand stitched the binding to the back of the quilt. It really does look invisible.
I hope your holidays were delightful. We've been busy reading books, playing with trains, dancing to Bing and doing "dishes!" Henry would rather roll up his sleeves and drag a chair up to the sink than play with his toys. Silly guy :)
The most satisfying craft project EVER!
I am drowning in craft projects for the holidays. Are you? Just in case you are like me, I thought I'd share one of my recent projects that went really smoothly.
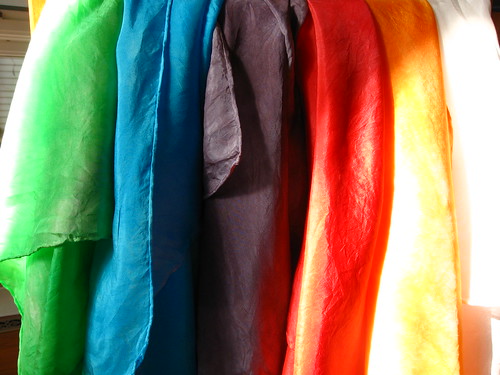
I dyed some playsilks for Henry. These are 35x35" hemmed pure silk (from here), and kids use them for imaginative play. They make lovely land or sea or snow playscapes. They can be used for capes or scarves or blankets or for peek-a-boo.
I used the procedure listed in this tutorial. The tutorial calls for packets of unsweetened Kool-aid for the dye. My kitchen smelled like piping hot Kool-aid with a tinge of vinegar for the night, but that was the only drawback. Two sets of silks were dyed and drying in my basement and the kitchen was cleaned up within an hour and a half of starting the project.
The flavors and number of packets I used are listed below.
blue: 2-3 packets blue raspberry
green: 3 packets lemon lime and 1/2 packet of blue raspberry
red: 1 packet black cherry, 1 packet tropical punch
purple: 2 packets grape
orange: 2 packets orange (I'd use 3 next time.)
Have you done any satisfying (and quick?) crafting lately? Do tell.
I dyed some playsilks for Henry. These are 35x35" hemmed pure silk (from here), and kids use them for imaginative play. They make lovely land or sea or snow playscapes. They can be used for capes or scarves or blankets or for peek-a-boo.
I used the procedure listed in this tutorial. The tutorial calls for packets of unsweetened Kool-aid for the dye. My kitchen smelled like piping hot Kool-aid with a tinge of vinegar for the night, but that was the only drawback. Two sets of silks were dyed and drying in my basement and the kitchen was cleaned up within an hour and a half of starting the project.
The flavors and number of packets I used are listed below.
blue: 2-3 packets blue raspberry
green: 3 packets lemon lime and 1/2 packet of blue raspberry
red: 1 packet black cherry, 1 packet tropical punch
purple: 2 packets grape
orange: 2 packets orange (I'd use 3 next time.)
.....
Deadline for Inspiration
Recently I joined a couple of holiday handmade/quilty swaps on flickr. The first swap was round 5 of Potholder Pass. This was a blind swap for one partner in which you send two holiday potholders and a handmade ornament. The catch was that there was only one month in between getting your partner's name and sending out your package. I found myself smack dab in the middle of a bunch of highly talented quilter's without a clue for what I'd make. Square in square block? Wonky star? Tree? Snowflake? eh.
Finally, I had a single spark 8 days before the deadline.
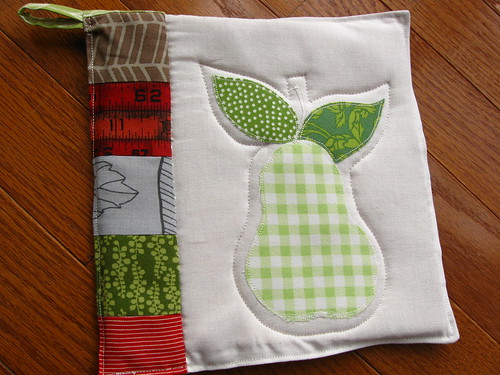
Here is my partner's inspiration mosaic. I stared at it off and on for days. Suddenly, the apple fabrics and the pear shapes and the leaves struck me, and I thought, "pear tree." That immediately led to singing a part from the Twelve Days of Christmas, which led me to "partridge!!" I knew I wanted details. I didn't want to fit a vague bird on top of a tree on a small potholder.
We've been doing a lot of reading to Henry about the alphabet and that led me think about alphabet books featuring one simple picture and a letter. I then exchanged the letter "P" for a strip of pieced squares instead. I thought the squares would tie the two potholders together best.
Then I drew my designs, and traced them onto freezer paper. I heavily starched my fabric choices, ironed the fusible webbing on the back, ironed the freezer paper shape on the front and then carefully cut out each shape. After that I peeled off the freezer paper, placed the pieces on the background fabric and ironed them to fuse. Lastly, I carefully appliqued each piece, adding the stem and the eye last.
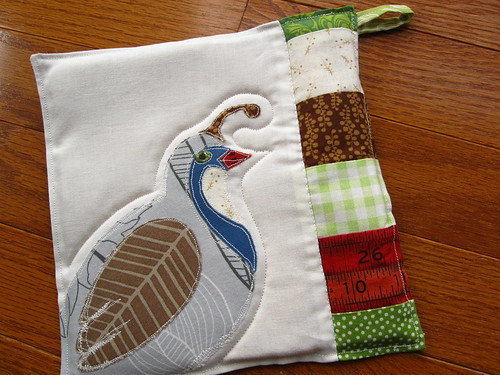
The bigger block was cut and the strip of squares was sewn on. I used a square of recycled felt sweater for the insulating part of the potholder. Wool felt works great to keep your hands safe and it is flame resistant. I also love the texture of wool inside a potholder as opposed to the standard crinkly Insul-Bright.
To complete the potholders, I did some simple machine quilting around the designs and some hand quilting in the ditch between the design square and the pieced border.
Sometimes I just have to wait for the creative inspiration to strike and then roll with it. I'm really glad I did. These were hard to let go of.
Next time I'll have to tell you about the ornament design that I made up and completed in just three days! I might just pull together a tutorial for it, too.
Finally, I had a single spark 8 days before the deadline.
Here is my partner's inspiration mosaic. I stared at it off and on for days. Suddenly, the apple fabrics and the pear shapes and the leaves struck me, and I thought, "pear tree." That immediately led to singing a part from the Twelve Days of Christmas, which led me to "partridge!!" I knew I wanted details. I didn't want to fit a vague bird on top of a tree on a small potholder.
We've been doing a lot of reading to Henry about the alphabet and that led me think about alphabet books featuring one simple picture and a letter. I then exchanged the letter "P" for a strip of pieced squares instead. I thought the squares would tie the two potholders together best.
Then I drew my designs, and traced them onto freezer paper. I heavily starched my fabric choices, ironed the fusible webbing on the back, ironed the freezer paper shape on the front and then carefully cut out each shape. After that I peeled off the freezer paper, placed the pieces on the background fabric and ironed them to fuse. Lastly, I carefully appliqued each piece, adding the stem and the eye last.

The bigger block was cut and the strip of squares was sewn on. I used a square of recycled felt sweater for the insulating part of the potholder. Wool felt works great to keep your hands safe and it is flame resistant. I also love the texture of wool inside a potholder as opposed to the standard crinkly Insul-Bright.
To complete the potholders, I did some simple machine quilting around the designs and some hand quilting in the ditch between the design square and the pieced border.
Sometimes I just have to wait for the creative inspiration to strike and then roll with it. I'm really glad I did. These were hard to let go of.
Next time I'll have to tell you about the ornament design that I made up and completed in just three days! I might just pull together a tutorial for it, too.
Subscribe to:
Posts (Atom)