Showing posts with label tutorial. Show all posts

Hand Quilting Video

I took a series of short videos of my hand quilting last year and posted them on Instagram.  Content on Instagram moves quickly, though, so I also took one longer video to post here on the blog.  It only took me about a year upload it...

In this video you can see how I start a line of quilting.  I always quilt from right to left but I pop the knot and tail of my thread on the left and then my first few stitches stabilize that thread tail and knot from popping back out.  I use both hands to produce the stitches.  Even though I'm right handed, my left hand helps produce each stitch by moving the quilt up and down. 


If you have any further questions, leave them in the comments.  I will email you back.  If you don't have an email address linked to your account, please leave the address in your comment.

I hope you are enjoying your December crafting time. I'll be machine quilting tonight on a project that I hope to show you early in January.

Patchwork Death Star Pattern

The pattern is posted to my blog. Link in my profile. Please please tag it #patchworkdeathstar.  I'd love to see it.

I was hoping to post this a couple of days ago, but it turns out that I'm not very tech savvy.  Thank goodness I finally pulled it together.  Here is the link for the pdf file for the free pattern and some instructions.

I have a couple of pictures that I took along the way that I'll post here.  If you do make a patchwork Death Star please please please post a link for me to see.  If you are on IG, please tag it #patchworkdeathstar.  Thanks!  I can't wait to see different versions.  I originally dreamed of this all in tiny Libery florals.  Wouldn't that be cool?

Well anyway, here is a shot of a few of my pieces after glue basting.
basted


And here is a picture of the top half pieced and sitting on top of my first drawing of it. 
In process

The final pattern will make an 11x12" block.  The perimeter fabric can easily be made larger by extending the paper pattern.  The Death Star itself could be made bigger by bringing the pdf printouts to a copy store and enlarging them.

May the force be with you. 

Starting and finishing

This quilt started as a first attempt at a quilt tutorial.  It was my very first jelly roll I ever bought and my first precut quilt.   It also was planned to be a throw quilt for my mom.  (This picture is from February of last year at our old house in Wisconsin.)

jelly roll race adaptation


Now we live in Maryland.  I made a much better tutorial for the Four Corners Quilt and it looked even better after it was quilted.  (Both posts have more photos in our old backyard.)  And, after discussing it with my mom, we both decided that this quilt was meant to go live with my aunt instead. 

spring

on the grass

I did simple diagonal lines quilting and marked the lines with my Hera marker (I love that tool). 

quilting

I used a thrifted sheet for the backing so it has a nice smooth hand.

binding shot

And, I have another UFO from last year done!  Four finished projects since the beginning of the year is a pretty good start (but I did start with a goal of 19 old projects from the last two years...)

Finished sometime last week...I think.

My camera is chock full of pictures to upload and things to write about, but I can only take a brief break in the packing to post this.

This is my Four Corners Quilt designed from one jelly roll and a 8" square of fabric (plus batting, backing and binding).  The tutorial for the quilt top is here.

Four Corners quilted

I am really proud of the quilting on it.  I started with four circles (traced a dinner plate) and my walking foot.  Then I followed the previous quilted line as I circled out further and further until I ran into other lines.  It really was a lot of fun.

Four Corners quilted

I did hand quilt the three center circle lines because those tight curves are tough with a walking foot.

Four Corners quilted


This quilt went to live with the two best neighbors in the universe.  I wish we could tuck them in our car and take them with us on our move.  I'm crossing my fingers that we win the good neighbor lottery again the next time we buy a house.

We take off on Friday, but I'll try to pop in again later this week. 

Farming Duo Block Tutorial

farming duo block tutorial


When I was making my Farmer's Wife blocks, I would cut the fabric for a number of blocks for a week or more, and then I'd sit down and sew a few at a time.  One night I managed to sew the pieces of one block wrong and (I think) I invented a new block.  It seems about time to share a tutorial for it.

This tutorial will make a 6" finished Farming Duo block.
  • Choose 3 fabrics for your block.  Cut (four) 2 x 3½" rectangles of two fabrics and (four) 2 x 2" squares of the third fabric and one of the first two fabrics.
 duo 1

  • Draw a corner to corner line on the back of all of the 2 x 2" squares.
duo 2


  • Arrange the rectangles in an alternating pattern.
 duo 3

  • Arrange the squares on the rectangles (right side to right side) with the drawn lines making a diamond shape in the center of 4 rectangles.
duo 4


  • Pin all of the square-rectangle pairs.
 duo 5

  • Sew directly on the diagonal lines.
duo 6


  • Trim a 1/4" away from the sewn diagonal seams.
duo 7

  • Press seams.
duo 8

  • Match rectangles in pairs and sew.  Then sew two pairs together, and lastly, sew the final center seam.
duo 9

  • Press all seams and trim the final block to 6½". 
duo final

I hope you like it!
.....
Please let me know if you make a block with this tutorial.  I'd love to see it.

Four Corners Quilt Tutorial

square photo
 
The idea for this quilt tutorial came from one I made in February--the Four Corners Quilt.  I attempted a tutorial at that time, but it wasn't pretty. So, here I go again, aiming to do better.

First, I must point you to the link for jelly roll race quilt video.   That is where I started from.


Four Corners Quilt Tutorial   --   the quilt will finish at about 56" square.

  • Start with one jelly roll and one 8 inch square block of coordinating fabric.  Rearrange the jelly roll strips randomly.  Sew the strips end to end until you have one super super long strip.  

super long strip

  • Cut 15" off of one end of your crazy long strip of fabric. Place the two ends of the strip, right sides together and sew a 1/4" seam all the way down the length until you are 4" from the end. Snip your super long strip in half at this point and then continue your seam to the very end and cut your thread.

2

  • Now take your two-strips-wide piece and place the two ends together, right sides facing and, again, sew a 1/4" seam for the full length stopping 4" before the end to cut it in half again.  Complete the seam.

4

  • Keep sewing like this until you have a piece of sewn fabric that is 16 strips wide.  (The photo below is 8 strips wide.)  As you keep sewing the strips together, keep in mind that pooling color works well for this pattern. 

8

  • Press all seams until they lie flat on your 16 strip wide piece of fabric. 
  • Cut your 16 strip piece in four equal sections.  Trim the edges of each piece until you have four pieces that are 25" wide. 

cut in 4

  •  Now measure the length of your sections.  If you have perfect 1/4" seams for your 16 strips, your fabric piece will be 32 ½" wide.  Mine, however measures 32 inches.  This measurement is very important, so do this step carefully.

measure

  • Since the center square is inset and we don't want to trim any fabric at the end, we have to carefully calculate the exact size of the square.  
          For a section measuring: 32 ½", cut an 8" square.
                                                   32 ¼", cut  a 7 ¾" square.
                                                   32", cut a 7 ½" square.
                                                   31 ¾", cut a 7 ¼" square.
                                                   31 ½", cut a 7" square.
                                                   31 ¼", cut a 6 ¾" square.
                                                   31", cut a 6 ½" square.
          My sections are 32" long, so my center square will be 7 ½".

  • Arrange your center square and your strip sections like this:
download-4

plan

  • Sew the center block to section 1 leaving one inch open (see below).
download-1

center square

attach center square


  • Sew section 2 onto section 1 plus the center square.  Make sure this seam goes edge to edge.  I pinned before sewing.
download-2
2 on 1


  • Sew section 3 onto that and make sure this seam goes edge to edge.  Again, I pinned first.
    download-3

  • Sew section 4 along the bottom edge of section 3 and the center square. 
    download-6
4 on 3


  • Lastly, pin, pin, pin section 4 to the edge of section 1 and close up the seam along the edge of the center square.
    download
      last seam 

  • Press your seams and you now have a finished quilt top!

Four Corners Quilt Tutorial


Four Corners Quilt


Let me know if you make a quilt using this tutorial. I'd love to see it!

Adapted Jelly Roll Quilt (now titled the Four Corners Quilt)

jelly roll race adaptation

The tutorial I had originally written for this quilt top did not have enough details. So, it is under construction. Please feel free to leave a comment with your email address if you want to be alerted when I finish the tutorial.  The new tutorial is finally up!  Check it out here.

Appendix A: Adding a door and chimney.

This is a continuation of a my previous tutorial for making tiny house blocks.

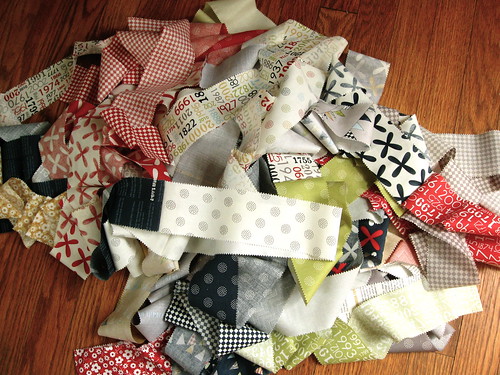
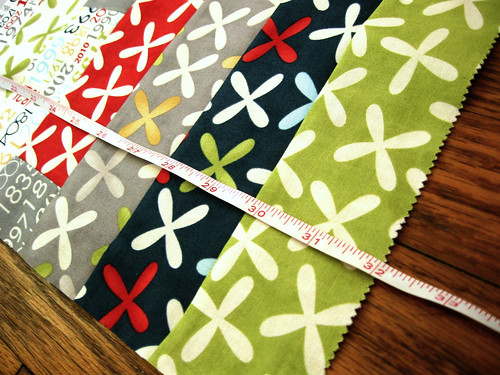
***PHOTO DISCLAIMER***  I took these photos after dark and with no flash, 
so please pardon any colors that are "off" and ignore any blurriness.


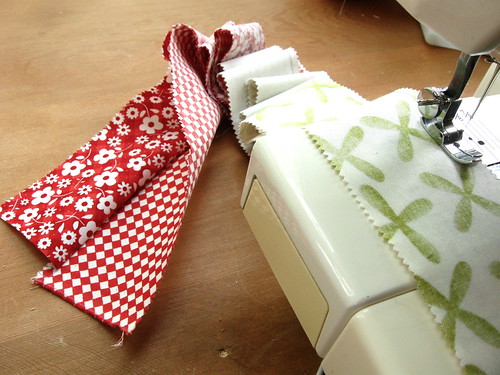
Unlike my first tiny house tutorial, this time I didn't use the foundation paper at all.  I had the opportunity to try out a Singer Featherweight at the quilting workshop in Colorado.  The feed dogs (and the foot) on that machine were so narrow and the stitching was so straight 
that tear away paper wasn't needed.
sewing on the featherlight


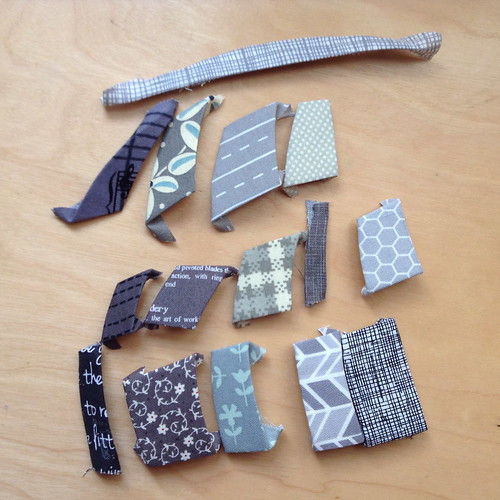
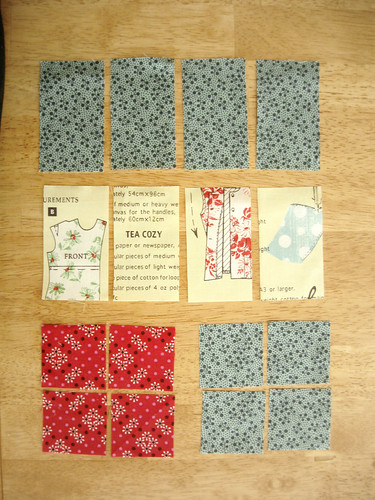
Start with a 1 inch wide and 2 inch long  piece of house color and door color fabrics 
and stitch them together.
IMG_5793


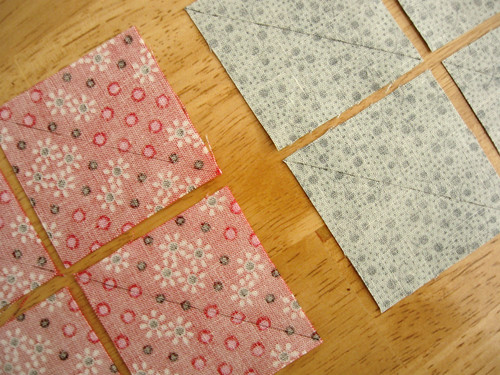
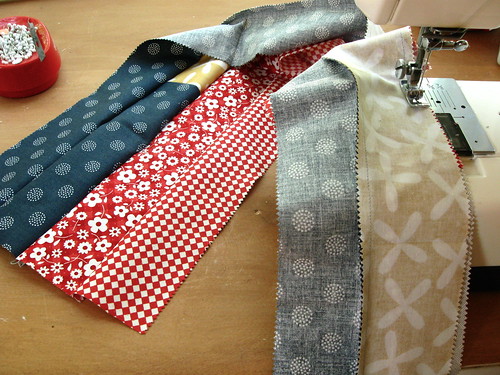
Then add sections of house fabric on either side of the door.
IMG_5794


Sew some background color (medium Kona gray in this case) on either side of the house color.
IMG_5802

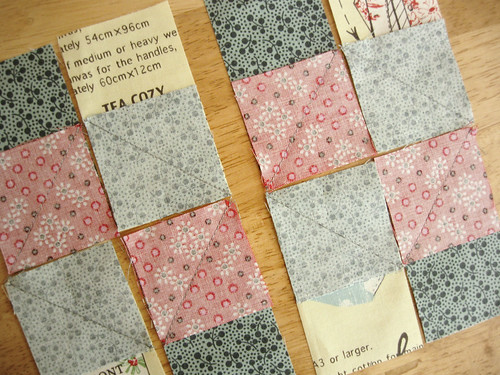
Then roughly trim the top and bottom edges of the block, 
knowing that you can always trim it smaller if needed.


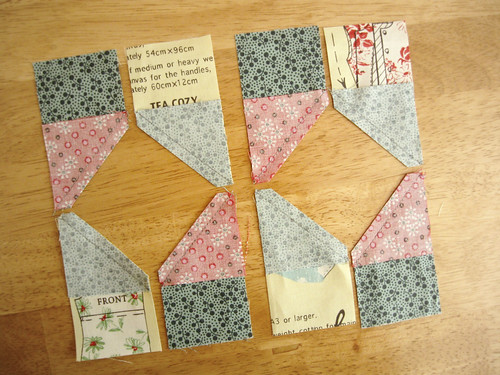
Next, chose the roof fabric.
IMG_5803


For my block, I wanted a crooked little red chimney sticking out of that roof.  I had to start with sewing some background fabric on a piece of red solid.  Again, this piece is 1" wide.
IMG_5796


I wanted a chimney that was a little fatter at the top than the bottom.  So, I made my fabric a little crooked before sewing.  Also, I want a slanted roof with the chimney on the right.  Notice how the fabric on the right side of the chimney has to be longer than the chimney itself. 

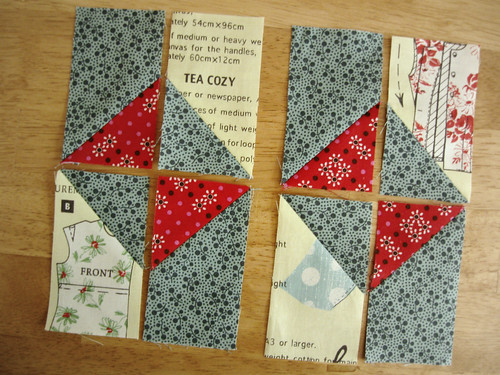
Once you've sewn more background fabric on either side of the chimney piece,
set the ruler at the angle you like for the roof slope.  Trim off the extra fabric 
(being sure to leave enough for a seam allowance).
IMG_5806


Test out the house, with the roof fabric and the angle you cut your chimney/background fabric at.  Carefully flip back the chimney/gray section while keeping the same angle--but be sure to adjust your fabric slightly for the seam allowance.
IMG_5807


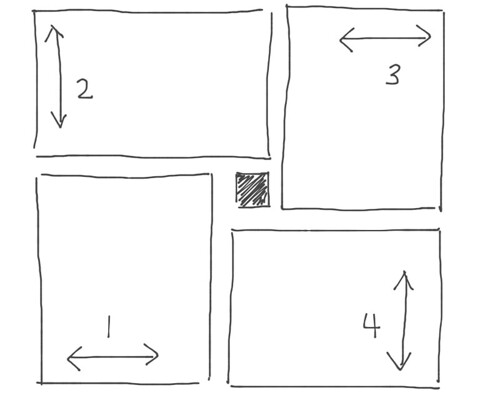
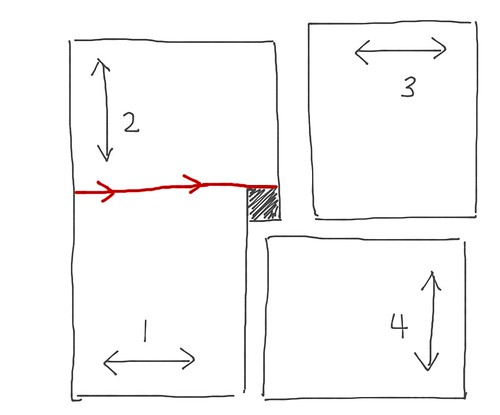
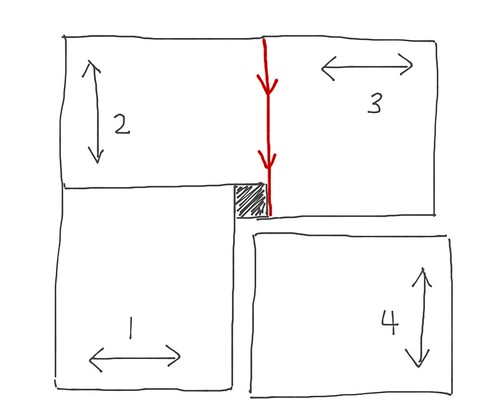
Lay your fabrics out again and follow the steps in the photo.
IMG_5808


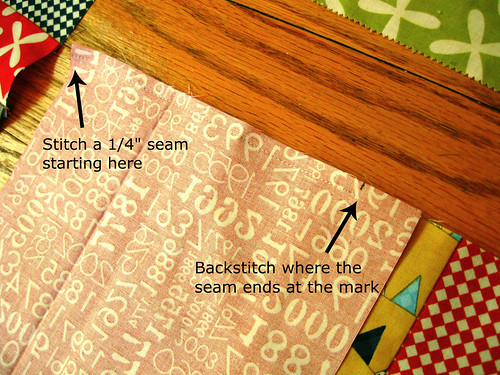
Carefully follow these steps:
IMG_5808

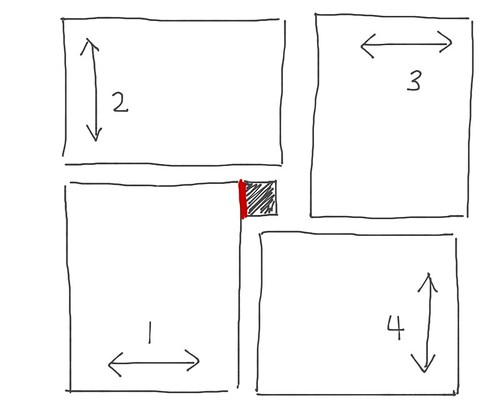
then flip the left roof slope portion back and line it up 
so it overlaps your chalk line by 1/4".  
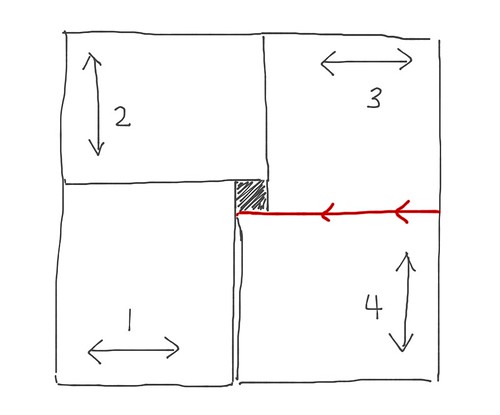
Sew with a 1/4" seam allowance.


 Use your ruler and rotary cutter to trim off the extra fabric.  Then press open and 
square up the roof portion of your block.
IMG_5809


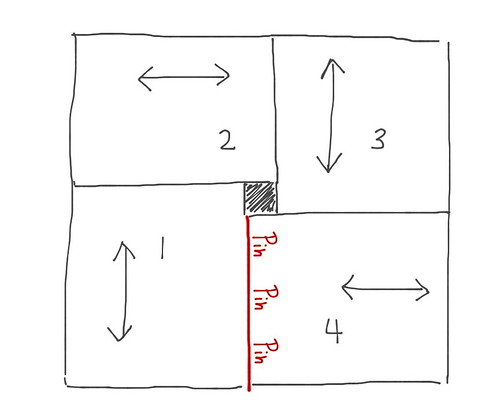
Set your house portion on top of your roof portion very carefully.  Line the fabric up so you have the roof exactly as you want it to look.  Then set your ruler on top of that with the 1/4" line along the top edge of the house portion.  Carefully slide the house portion out without shifting 
the roof portion or the ruler....
IMG_5811


...then use your rotary cutter to trim off the excess fabric. 
IMG_5812


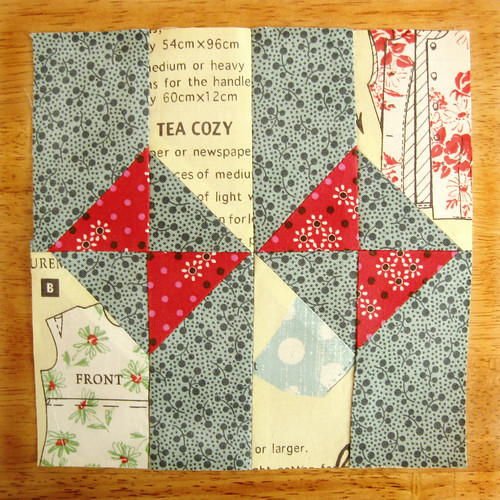
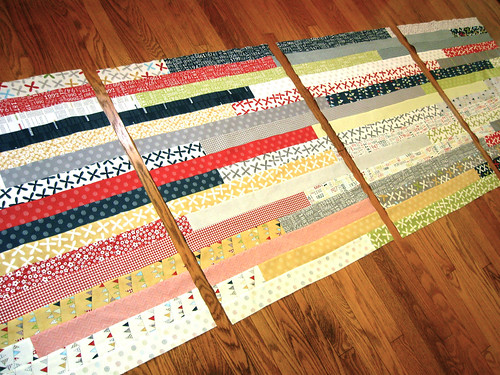
Sew the roof and house portions together, press, square the block with your ruler and rotary cutter
and admire your completed tiny house block! 
finished tiny house

Happy sewing to you.