Special Request

I've had a couple of requests lately for Henry photos on the blog.  It has been quite awhile.  He's much harder to capture on pixels now that he is constantly moving.  (He was outside in his pajamas at 9pm tonight, trying to shovel the driveway--despite no snow and 60˚ weather and past bedtime.) Also, the poor guy has been off and on sick for six. lousy. weeks. now.  I hope that next week can start a l-o-n-g fever-free, doctor-free, antibiotic-free time for him. 


Anyway, I caught some still-ish moments last weekend.

park 1
park 2


And Ben and I took him swimming on Sunday.

my blue eyed boys
pool 1


Alright. Now that the Henry fix is taken care of, it is back to craft posting tomorrow.

Swap Fun

I just sent out a swap package to my partner in the Apron Extravaganza Swap.  I had some hexies laying around that were begging for a good home.  So, I designed a tea cozy to put them on.

tea cozy front

tea cozy back


I added a gusset and hand stitched the edge to make it stand out a bit more.
tea cozy gusset handsewing


And, a pieced lining.  The batting is doubled to keep the tea extra cozy (but the gussets are single layer so they would fold better).
tea cozy lining


My swapee has a young baby, so a bib seemed like the perfect kitchen swap extra (this is JCasa's Best Bib pattern).  The blue gingham ribbon is awfully cute...
swap extras


...and the cards are stamped with my carved sewing machine stamp.
handmade stamp for cards

Whew! I have some exciting things coming up next week, so it is a relief to get this swap done early. I'll be sure to post a pic of my swap items when they get here.


P.S.--If you want to get in on some sewing swap fun, I just joined the Pretty {little} Pouch Swap on flickr. It is full of talented ladies and sign ups close April 8th.

Tiny House Tutorial

I'm sure there are a ton of house block tutorials out there, but I'm looking for   ** TINY **   houses for my bee quilt.  Also, most of the wonderful ladies that are making blocks for me are new to quilting and haven't done any improv piecing.  So, I'll try my hand at a tutorial.  I do find it hard to describe improv piecing with directions.  By definition, improv is piecing in the moment, choosing fabrics that feel right next to each other and making mistakes and learning from them.  Or, at least that is my definition. :)

I want a tiny house block 4 1/2 " square, and I'm using the green color scheme to represent my house in this quilt.  I started first with the green seeds fabric on the bottom left and I cut it to 2"x3".  Then I decided to put some of the big green dots in between the seeds fabric and the bandana fabric.
IMG_5650


Sew them right side together on top of tear away foundation paper. Sewing such small pieces of fabric without foundation distorts their overall shape. The paper also helps secure the first stitch or two, so I don't get any thread tangles.
IMG_5652


Press the seam open. Then audition how wide the big dot fabric should be before I sew the bandana fabric on.
IMG_5654IMG_5655IMG_5653


Use a quilting ruler to cut the extra fabric off. First, fold the paper back. Then place the 1/4 seam dashed line where you want the seam, and then use the rotary cutter to trim the fabric that is past the edge of the ruler.
IMG_5656


Fold the foundation paper back open.  Sew a strip of background fabric (white) on the other side of the seed fabric.
IMG_5657


Sew the bandana fabric on the right edge of the big dot fabric.
IMG_5658


Press open. Then get out your ruler to determine where to cut the bandanda fabric to sew the background fabric (white) on.  I found that the background fabric needed to be 3/4" to 1" wide on either side to allow for a nice roof overhang.
IMG_5659


Cut the house portion of the block to the final width of 4.5" and 3" high. The roof portion of the block will  be 2" high when seam allowances are added in.
IMG_5661IMG_5660


Audition roof fabrics:
IMG_5662IMG_5663IMG_5664


I liked the pieced roof.  Therefore, sew together two strips of fabric (on another piece of foundation paper).
IMG_5665


Iron open, then trim that to 2" by 4.5".  Cut two pieces of background (white) fabric to 3.25" square. 
IMG_5673


Align one white square with the top left corner of the roof fabric (pin this together if you aren't too lazy to pin, like I am). Make a pencil mark where the bottom left corner of the roof fabric is.
IMG_5674


Using a small scrap of foundation paper (or a fabric scrap) sew a few stitches to anchor the thread. Leave the needle in the down position, lift the presser foot and align your fabric with that pencil mark you made. Then lower your presser foot and sew a freehand angle from that pencil mark to the top of the roof.
IMG_5675


Trim that seam allowance to 1/4".
IMG_5677


Press the white fabric open.
IMG_5676


Trim the extra white fabric off.
IMG_5678


Lay the second white square on and make your pencil mark again. Sew it the same way with a scrap to secure the thread, pencil mark right at the needle, freehand angle to the rooftop.
IMG_5679


Again, trim the seam allowance, press the fabric open and trim the excess fabric off.
IMG_5680


Tear the foundation paper off of the roof portion. Lay the roof portion of the block on top of the house part of the block. (Pin if you want to.) Sew that seam. Tear off the last of the foundation paper and press open. Ta-dah!!
IMG_5684
This is the block, 4 1/2" square.  I'll have about eighteen of them in the quilt. 
Here is the my inspiration gallery if you want other house shape ideas.

I can't wait to show off all of the house blocks as they come back to me from the bee.

Distractable much?

I had excellent intentions of catching up on old projects and bee blocks this month. Part of that requires not picking up any new projects. Well, I might as well throw that idea out the window. The stack of fabrics from my last post has completely bewitched me. I think about them when I sleep at night, at work, in the shower, all of the time.

So, I had to start cutting and rearranging.

arranging the blades


And while that looked okay, I knew I didn't want a perfect dresden plate.  Then I was consumed with which leaves needed to be cut and pieced back together.


slowly piecing


It took two and a half days to sew it together, but I have to admit that I like it. 


all sewn up


Now my brain is busy processing what fabrics to use for the center and the background....

sshhhhhhh! i'm cheating on my sewing projects.........with knitting.

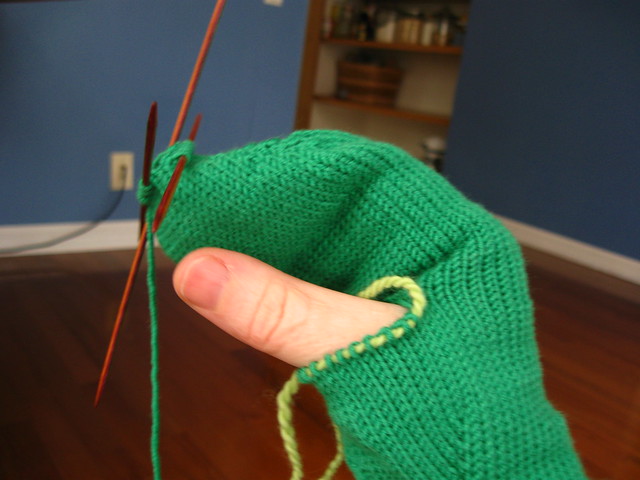
I'm currently knitting a simple mitten pattern, in some of the prettiest yarn ever.  I tried two other patterns with cables and texture, but they just didn't work with this yarn. 


This solid color, smooth yarn is a departure for me.  I usually pick a heather yarn, or a tweedy yarn or variegated.  I like nubby and thick/thin yarns.  And I usually wear something  in a muted tone.
But these bright green mittens will be for ME!

So, anyway, my sewing machine may feel neglected for a bit.  
In the meantime, mitten puppets with double point needles area fun way to entertain a toddler.


green mittens in progress

Warmer Days Ahead

I have a collection of vintage sheet fabric.  I pick them up at thrift stores and then cut them up for sewing projects.  I love picking ones with sunny, bright colors. 


lemons and limes top

This quilt is roughly 40 x 40" and will be a baby quilt for donation.

I had so many scraps already cut up that I just arranged pieces and sewed it 
all together in a day. Getting it basted and quilted will take me much longer, 
but I just had to share a peek (or two) of my work in progress.

lemons and limes top

The sunny fabrics sure were fun after shoveling all of that snow this week!